
Workspace
How to Organize Cables Under Your Desk
A messy space under your desk can make an otherwise organized workspace difficult to use. Learn how to route, group, and store cables while keeping power strips, chargers, and connections easy to reach.
By Ronald Dadivas · Published 30 September 2026 · Updated 1 October 2026
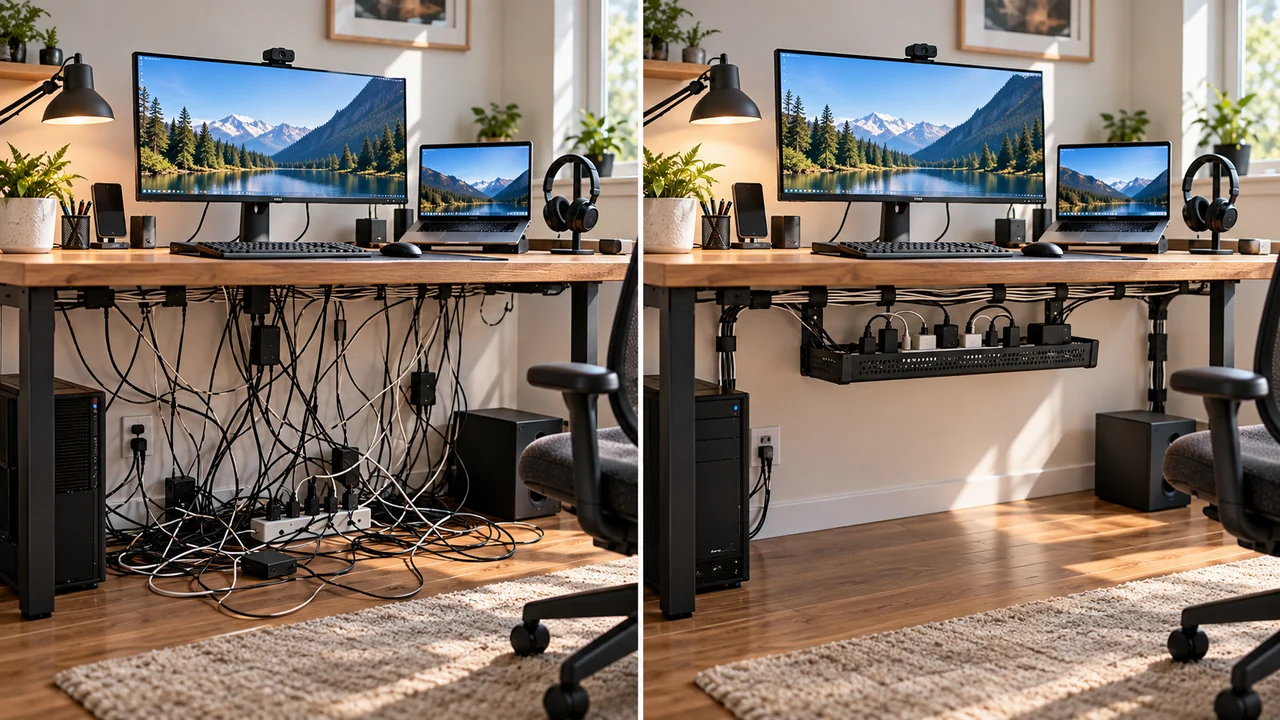
A desk can look organized from above and still be a mess underneath.
You may have a monitor cable hanging behind the desk, a laptop charger running toward the floor, a power strip sitting beside your feet, and several USB cables mixed together. If you use a standing desk, things can get even more complicated because those cables need to move with the desk.
The good news is that you don't need to hide every cable or buy a complicated cable-management system.
You need to figure out which cables you actually use, where each one needs to go, and how to keep them out of your way.
The best setup is usually the one you can understand, reach, and change without taking everything apart.
Here's how to organize the cables under your desk.
Start by Figuring Out What Each Cable Does
Before you start tying cables together, figure out what you actually have.
This is especially important if you've been using the same desk for a long time. You may have cables connected to devices you no longer use, old charging cables, or connections that were simply left behind after you changed equipment.
Look underneath your desk and identify the cables connected to:
- Your monitor
- Laptop or desktop computer
- Keyboard
- Mouse
- Speakers
- Headphones
- Phone charger
- External drives
- USB accessories
- Power strip or extension cord
You don't necessarily have to unplug everything.
Start by following each cable from one end to the other.
Ask:
“Where does this cable start? Where does it end? Do I still need it?”
Once you know what each cable is doing, you'll have a much easier time deciding how to organize it.
Remove the Cables You Don't Actually Need
Don't organize cables just because they're there.
If you have an old HDMI cable underneath your desk that isn't connected to anything, it doesn't belong in your active cable-management system.
The same applies to:
- Old phone chargers
- Spare USB cables
- Unused extension cords
- Duplicate cables
- Chargers for devices you no longer own
- Cables left behind after replacing equipment
Put useful spare cables somewhere else.
A small drawer or cable-storage box can work well for this.
The important distinction is:
Active cables stay with your workspace. Spare cables get stored separately.
This one change can make cable management much easier because you're no longer trying to organize cables that don't need to be there.
Decide Where Your Power Strip Should Go
If your power strip is sitting loose on the floor, start there.
The power strip is often where several cables come together, so its location affects everything else underneath the desk.
Depending on your setup, you might place it:
- Under the desk
- Inside an under-desk cable tray
- Behind the desk
- Near a desk leg
- On a suitable mounting surface
You want it close enough to the devices that you don't need long loops of excess cable.
At the same time, don't put it somewhere that makes it difficult to reach.
You may need to unplug something when you:
- Replace a monitor
- Move your desk
- Clean underneath the desk
- Troubleshoot a device
- Add another piece of equipment
A power strip that's hidden so well that you can't reach it isn't particularly useful.
If Your Cables Are Spread Across the Floor, Fix the Route First
Here's a common setup:
Your monitor is on the desk.
Its power cable drops behind the desk.
Your computer cable runs toward the floor.
Your phone charger goes in another direction.
The power strip is sitting several feet away.
Now you have cables running across the floor in different directions.
Instead of buying more cable accessories, fix the route.
Think of your cable system as a path:
“Device → back of desk → under-desk route → power source”
For example:
“Monitor → back of desk → cable tray → power strip Laptop charger → back of desk → cable tray → power strip Speaker → back of desk → under-desk route → power source”
You don't need every cable to follow exactly the same path.
You just want to eliminate unnecessary crossings and loops.
Keep Cables Off the Floor When You Can
Loose cables on the floor can become difficult to clean around and can create a trip hazard when they cross walking areas.
This is particularly important if your desk is in a bedroom, living room, or another space where people regularly walk around it.
Look underneath your desk and ask:
Could my feet catch any of these cables?
If the answer is yes, change the route.
An under-desk tray can help when several cables need to travel together. Clips can help keep individual cables against the underside or back of the desk.
If a cable has to travel across part of the room, route it along a safer path rather than leaving it loose across an open walkway.
You don't have to make every cable invisible.
You just want the cables to stop becoming part of the floor.
Group Cables That Naturally Travel Together
Once you have a route, look for cables that travel in the same direction.
Suppose your monitor has a power cable, DisplayPort cable, and USB cable. All three may travel from the back of the monitor toward the same area underneath the desk.
Those cables can be grouped together.
You can use:
- Reusable cable ties
- Cable sleeves
- Cable clips
- Simple cable holders
But don't automatically bundle every cable together.
That's one of the easiest ways to create a system that looks neat but becomes frustrating later.
Imagine you need to replace your monitor cable.
If six unrelated cables are tightly wrapped together, you may have to undo the entire bundle just to remove one cable.
Instead, group cables based on where they're going or what they belong to.
Don't Create One Giant Cable Bundle
A giant bundle can look impressive when you're finished.
It can also become a nightmare six months later.
For example, you might have:
- Monitor cables
- Computer cables
- Phone charger
- Speakers
- USB accessories
- Desk lamp
If you wrap all of them together, changing one device becomes difficult.
Instead, create smaller groups.
For example:
Monitor group
Power + display + USB
Computer group
Power + peripherals
Charging group
Phone + frequently used USB cables
This makes the system easier to understand.
Good cable management isn't about creating the tightest bundle possible.
It's about creating a system you can still work with later.
Leave Enough Slack for Your Devices to Move
Don't pull cables tight just because you want them to look neat.
Cables need some room to move.
This is especially important for:
- Standing desks
- Adjustable monitors
- Laptop setups
- Devices that you regularly move
- Equipment mounted on monitor arms
If you use a standing desk, raise it before securing the cables permanently.
Then check what happens.
Do the cables become tight?
Does the monitor cable pull against the connector?
Does the power strip move?
Does anything catch on the desk frame?
Do the cables rub against moving parts?
Now lower the desk and check again.
A cable setup that looks perfect at sitting height but becomes tight when the desk rises isn't properly organized.
The same principle applies to a monitor arm.
If your monitor can move, your cables need enough slack to move with it.
If You Use a Standing Desk, Test the Full Height Range
Standing desks deserve special attention because the entire cable setup moves.
A common mistake is to organize everything while the desk is at sitting height and assume the cables will be fine.
They might not be.
Raise the desk slowly and watch the cables.
Pay particular attention to:
- Power cables
- Monitor cables
- Laptop charging cables
- Ethernet cables
- USB connections
- Cables running near the desk frame
You want enough slack for the highest position without leaving a large amount of loose cable hanging when the desk is lowered.
If the desk has a built-in cable-management system, use it where practical.
If not, an under-desk tray or clips can help keep the cables controlled.
The important part is to test the actual movement, not just look at the cables while the desk is stationary.
Keep Frequently Used Cables Easy to Reach
Not every cable should be hidden underneath the desk.
Think about your phone charger.
If you unplug it several times a day, routing it deep underneath the desk may make your setup harder to use.
A small cable clip near the edge of the desk can give it a consistent place.
The same can work for:
- Headphone cables
- USB cables
- Camera cables
- External-drive cables
- Charging cables
The question isn't:
“How can I hide this cable?”
The better question is:
“How often do I need to touch this cable?”
A cable you never touch can be routed and secured.
A cable you use every day should remain accessible.
Keep Monitor Cables Easy to Identify
Monitor setups can become confusing quickly.
A single monitor might have:
- Power
- HDMI
- DisplayPort
- USB
- Audio
- Other connections
If you have two monitors, the problem gets worse.
Don't bundle the cables so tightly that you can't tell which one belongs to which device.
If you regularly disconnect your equipment, small cable labels can help.
You could label cables:
Monitor 1 Power
Monitor 1 DisplayPort
Monitor 2 Power
Laptop Charger
You don't have to label every cable.
Use labels where they will actually save you time.
Keep Charging Cables Separate From Permanent Connections
Think about how you use each cable.
Your monitor power cable might stay connected for months.
Your phone charger might be unplugged every day.
Those cables shouldn't necessarily be organized in the same way.
For permanent connections:
Route and secure them.
For frequently removed connections:
Keep them accessible.
For spare cables:
Store them somewhere else.
This simple distinction prevents cable management from becoming too restrictive.
You don't want to create a beautiful system that makes a five-second task take five minutes.
Use Cable Clips When You Only Have a Few Cables
You don't always need an under-desk tray.
If you have a laptop, one monitor, and a few accessories, several clips may be all you need.
For example, you could use clips to keep:
- A phone charger near the front edge
- A monitor cable against the back of the desk
- A speaker cable following one desk leg
This works particularly well when your main problem is that cables keep falling to the floor.
Start with the simplest solution that fixes the actual problem.
If clips solve it, stop there.
You don't need to build a complicated cable-management system just because one exists.
Use an Under-Desk Cable Tray When You Have Several Connections
A cable tray becomes more useful when you have multiple cables traveling underneath the desk.
It can give your power strip, adapters, and cable slack a defined location.
For example, a desk with:
- Two monitors
- A desktop computer
- Speakers
- A laptop charger
- Several USB accessories
may benefit from a dedicated route underneath the desk.
The tray keeps the cables together without requiring you to individually attach every cable.
But again, don't buy one simply because your desk has cables.
Look at the problem first.
If you only have three cables and they're already easy to manage, a tray may not add much.
Keep Excess Cable Under Control
You don't want to pull a cable tight just to make the underside of the desk look cleaner.
Instead, manage the excess.
Create a loose loop and secure it with a reusable tie.
Keep the loop somewhere accessible.
Avoid creating a large pile of cable on the floor.
Also avoid tightly bending cables simply to make them shorter.
You want enough slack for normal movement without leaving a large amount of loose cable hanging around.
If You Have a Small Desk, Prioritize the Most Important Cables
Small desks often have less room underneath as well.
You may not have enough space for a large tray, several boxes, and multiple bundles.
That's okay.
Start with the cables that cause the biggest problems.
For example:
- Remove unused cables.
- Get the power strip out of your foot area.
- Route monitor and computer cables.
- Keep frequently used charging cables accessible.
- Deal with the remaining cables afterward.
You don't need to organize every cable at the same time.
Fix the problems you notice most.
Keep Cables Away From Your Feet
Sit at your desk and look underneath.
Where do your feet normally move?
If a cable is hanging directly beside your leg or lying where your feet can catch it, move it.
Pay attention to:
- Loose loops
- Power strips
- Cables crossing the leg area
- Excess cable on the floor
- Cables running across walkways
This is one reason cable organization isn't only about appearance.
A clean-looking setup is nice.
A setup that doesn't interfere with your feet, chair, cleaning, or movement is more useful.
Don't Put Every Cable Inside a Cable Box
Cable boxes can be useful, but they aren't a universal solution.
A box can help contain:
- A power strip
- Excess cable
- Several adapters
- A group of cables that would otherwise remain visible
But if you only have a few cables, a box may simply give you another object to manage.
Before buying one, identify the actual problem.
Are your cables:
- Tangled?
- Hanging?
- On the floor?
- Difficult to access?
- Crossing your feet?
- Too long?
- Simply visible?
Each problem can have a different solution.
Don't buy a cable box when what you really need is one cable clip.
Store Spare Cables Somewhere Else
Your active cable system should not also be your cable storage system.
If you have ten spare HDMI cables underneath your desk, you're going to keep fighting the same clutter.
Move spare cables into a drawer, box, or cabinet.
If you have enough of them, separate them by type:
- Charging cables
- USB cables
- Display cables
- Power cables
- Adapters
You don't need a complicated labeling system.
The purpose is simply to stop your active workspace from becoming a storage area for cables you aren't currently using.
Make It Easy to Replace One Cable
Here's a useful test.
Imagine your monitor cable stops working tomorrow.
Could you remove it without taking apart your entire cable system?
If the answer is no, your cables may be too tightly organized.
The same applies if you replace:
- Your monitor
- Your keyboard
- Your computer
- Your speakers
- Your phone charger
Leave important connections accessible enough that you can change one component without rebuilding everything.
This is where reusable ties and removable clips can be more practical than permanent solutions.
Keep Cables Away From Moving Parts
If your desk has moving components, make sure cables don't interfere with them.
This includes:
- Standing-desk legs
- Monitor arms
- Keyboard trays
- Adjustable shelves
- Other moving desk components
Move the equipment through its normal range and watch the cables.
If a cable gets pulled, pinched, or caught, change the route.
Don't assume a cable is safe simply because it isn't touching the moving part while the desk is stationary.
Check Your Setup From Above and Below
Once you've finished organizing, look at your desk from both directions.
From above
Check:
- Are cables unnecessarily coming over the back edge?
- Are frequently used cables easy to reach?
- Is anything interfering with your workspace?
From below
Check
- Are cables hanging?
- Is anything near your feet?
- Is the power strip accessible?
- Are cables crossing the floor?
- Can you follow each important cable?
- Can you still reach the connections?
This matters because a desk can look perfectly clean from above while the underside is still a tangled mess.
Don't Try to Make Every Cable Invisible
This is an important distinction.
The goal isn't to create a desk with absolutely no visible cables.
Some cables need to remain visible because you use them.
Some cables need to remain accessible because you regularly unplug them.
And some cables simply don't have a practical reason to be hidden.
Instead, aim for a setup where cables are:
- Routed intentionally
- Easy to identify
- Away from your feet
- Off walking paths
- Accessible when needed
- Easy to change later
That's more useful than hiding everything for the sake of appearance.
Give Each Type of Cable a Simple Home
Once your system is working, give different cables predictable places.
For example:
Permanent connections
Route them underneath the desk and keep them secured.
Frequently used cables
Keep them near the edge of the desk with clips.
Spare cables
Store them in a drawer or box.
Excess cable
Secure it into a loose loop near its route.
Power strip
Keep it accessible and away from your feet.
You don't need a complicated organizational system.
You just need to know where something belongs.
Check Your Cable Setup After a Few Days
Don't assume your first arrangement is perfect.
Use your desk normally for a few days.
Then notice what keeps bothering you.
Maybe your phone charger keeps falling behind the desk.
Maybe your monitor cable is too short when you raise the desk.
Maybe you keep bumping the power strip with your foot.
Maybe one cable needs to be unplugged regularly.
Those observations are useful.
Fix the problems that actually appear during normal use.
This is better than trying to design a perfect system before you've lived with it.
Use This Simple Cable Organization Checklist
Before you finish, check your setup:
- Have I removed cables I don't actually need?
- Do I know what each active cable does?
- Is the power strip in a sensible location?
- Are cables routed toward their destinations?
- Are cables off the floor where practical?
- Are cables away from my feet?
- Are frequently used cables easy to reach?
- Can I identify my monitor and computer cables?
- Is there enough slack for normal movement?
- If I have a standing desk, do the cables work at both sitting and standing height?
- Can I replace one cable without dismantling everything?
- Are spare cables stored separately?
- Can I still reach the power connections?
- Are moving desk parts clear of cables?
- Can I clean underneath the desk without fighting the cables?
If most of these are true, your cable-management system is probably doing what it needs to do.
Your Cable Setup Should Make Your Desk Easier to Use
You don't need to hide every wire under your desk.
Start by removing the cables you don't need. Then decide where your power strip should go, create sensible routes for your active cables, keep them away from your feet and walking paths, and group only the cables that naturally belong together.
Keep frequently used cables accessible.
Leave enough slack for equipment that moves.
Store spare cables somewhere else.
And most importantly, make the system easy to change.
A good cable-management setup shouldn't become another project you have to maintain.
The best cable setup is one that keeps your workspace clear without making your equipment harder to use, replace, or move.